
Monday, June 20, 2016
Second Pond Trial
Took EC TOWNE out for the second time. Windier than the first time. Boat still responded well, into the wind, across the wind, even with me in the boat by myself, that ballast having gone to get the trailer. Also, we tried the oars for the first time and I guess I got the ergonomics worked out pretty well as it was easy and comfortable to row. Oars against the wind wee not nearly as good as the motor against the wind. Nice surprise. Here she is with bow out of the water and still able to take on the wind.

Tuesday, June 14, 2016
SHE GOES 1111
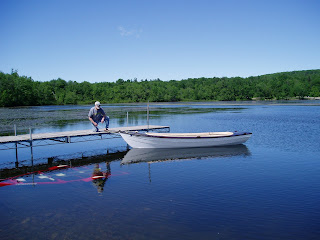
EC TOWNE splashes. Sea trial a resounding success. Here are a couple of pics in the water. Click on the pics to enlarge.
 Kids sitting on the end of the dock when we launched wanted to know if I built her. Told them she was built in 1910 and I just cleaned her up a bit.
 Sorry, no pics underweigh. Did not bring my gps but am satisfied with her speed and very happy with the way she headed into the wind which was pretty strong out in the wide part of the lake. I had heard that trolling motors were pretty much worthless against a strong breeze but not probe going along at half throttle.
 half throttle brings to mind the only problem. She vibrates a bit at full throttle. I thought I had pretty tight tolerances at the top and bottom of the "well" but maybe not. Thinking of putting a grease fitting on the tube and packing her with heavy grease. Should damp the vibe.


Tuesday, May 17, 2016
Coaming Painted


Thursday, May 12, 2016
New Deck and Cradle on Trailer
Finished the cradle for the power dory and installed it onto a new pressure treated deck on the trailer. Looks pretty good. Cradle has bunk carpeting glued on with PC Premium. I realize there might be a problem in the future with that method of installation but decided to give it a try.
 Also CPESed the new coaming and am waiting for a full cure before painting. Lady at Jamestown said four or five days. Hard to wait. Very happy with the way the coaming came out. Can't wait to see it painted. Getting closer all the time.


Wednesday, May 4, 2016
Coaming Completed—Needs Only Paint
Installed the sides of the coaming. A bear to fair, but I think I got her pretty well. Here are some pics.
 Two views looking forward (above and below)

 Two views looking aft.(above and below)
 Side view, my ow those license plates light up. Click on the photos to enlarge them. Click on margin to return to this view.


Friday, April 29, 2016
Bending Coamings: A Reasonable Success
 |
| The old man (me) fine tuning the form for the stern coaming |
 |
| The steam box, plywood wind screen in place. The whole process was plagued by equipment failure. The borrowed turkey boiler worked well for a while, then it didn't. I bought a new one,tried to refill the gas tank only to find it was out dated and they would not refill it, bought a new tank—it goes on and on. Altogether a success but I hope never to have to do it again! |
 |
The first attempt ended in failure           |
Sunday, April 10, 2016
Some Progress and Some Regression
Using multiple 45 degree street ells I was able to turn the wires 180 degrees to make a water resistant connection for the top of the shaft. Next I installed a disconnect to join the motor to the control head.
 Here is the fix on the battery compartment
 The regression occurred when I realized the batteries I selected would not fit into the opening under the center thwart. I solved the problem by adding bread board ends to the seat and widening the opening to 26 and one quarter inches. Just enough for two 13 inch batteries weighing 59 pounds each.


 |
| Sorry about this, I don't know why the pictures of the seat remodel were inserted between the others but I am not smart enough to change it. |
 |
| Here is the connector from the motor to the control head. a clumsy place to work and solder the bits but it is done. Very close to connecting the batteries and seeing if it works. |
Subscribe to:
Posts (Atom)